Feb 18, 2014

Kill Team and mini tournament

And some more pictures I found in my camera... Some Kill Team! One evening we played some Kill Team, I brought out an elite warband of Chosen and faced off against Salamanders and Blood Angels with the new Kill Team Rules. I really like those scenarios!

I think the pictures got a bit messed up in order when uploading... These are two games against the plasma heavy Salamanders anyhow.

Game 1:


It was a really brutal game where shooting was king. I had a really hard time to stand up to those Plasma guns, so the Salamanders were victorious.

Game 2 against the Salamanders:


Game 2 I was a lot more cautious, trying to use the terrain a lot more, knowing how much it hurt to have models removed each turn. That combined with some luck (twin-linked plasma guns failing to hit/wound) saw me victorious in game 2!

Game 3 against Blood Angels.


This was a pretty cool scenario where I had to try to get off the board with my troops while the Blood Angels got victory points for killing enough of my units. Basically, had I got a single model off the board I would've won. And I would've managed that if I had rolled 4 or more on a run move after surviving a ridiculous amount of shots for one turn... I rolled a 3 and as you can see above was caught in assault with my lone survivor. Alas!


On a completely different note I recently bought a table big enough to play on. This I celebrated by inviting some friends to play a mini-tournament of four players. A couple of pictures from those games:


First roll of the game.

After this I forgot pictures... but my semi-flying circus wrecked the Blood Angels pretty bad. It was all topped off with Terrifying his large unit of Death Company, assaulting them and killing Dante in a challenge with a Daemon Prince... and well, good luck running away from I9. Heh.

On the other board we saw Iron Hands (with two Land Raiders!) face off against Eldar.

That Land Raider is black. Promise.
And in my second game, the winner's game I faced off against Eldar. Pretty shooty list with lots of Warwalkers, Guardians and Weapon Platforms, all made Fearless by the Avatar.


I had some bad rolls at crucial moments, was grounded in every turn (but managed to survive pretty well), Screamers failing to kill warwalkers (getting killed in the process...) etc. And my reserves were delayed to turn 4... I really should learn not to put stuff in reserve against Eldar. You really need those stuff on the board when you're up against the space elves. I was pretty much killed piece by piece and didn't have much say in this game.

But nice to have the board where you don't have to become a hunchback to play! Yay!

Feb 14, 2014

2 games of Flying Circus vs Eldar

So over at The Warmaster-forums user bladesteel, a fellow swede among all Americans found me and challenged me to a game or two. Turned out to be two. He brought Eldar and I tried out a Flying Circus for the first time, as well as Be'lakor.

Again, these are old games and I can't remember the powers rolled or gifts etc... so take it as you will!

The lists were something like this:

Daemons:
Be'lakor
Keeper of Secrets (With Portalglyph)
2 units of Daemonettes
10 Seekers
3 Slaanesh Princes (the Gray one has Grimoire, the other two lashes)

Eldar:
Mantarch (Autarch on Jetbike with Mantle of Laughing God)
Autarch on Jetbike (Warlord)
Wraithguard w D-scythes in Wave Serpent
Wraithblades in Wave Serpent
2 units of Dire Avengers
4 units of Jetbikes
8 Warp Spiders
Wraithknight
Wraithlord w Brightlance


Game 1

Hammer and Anvil, The Relic.

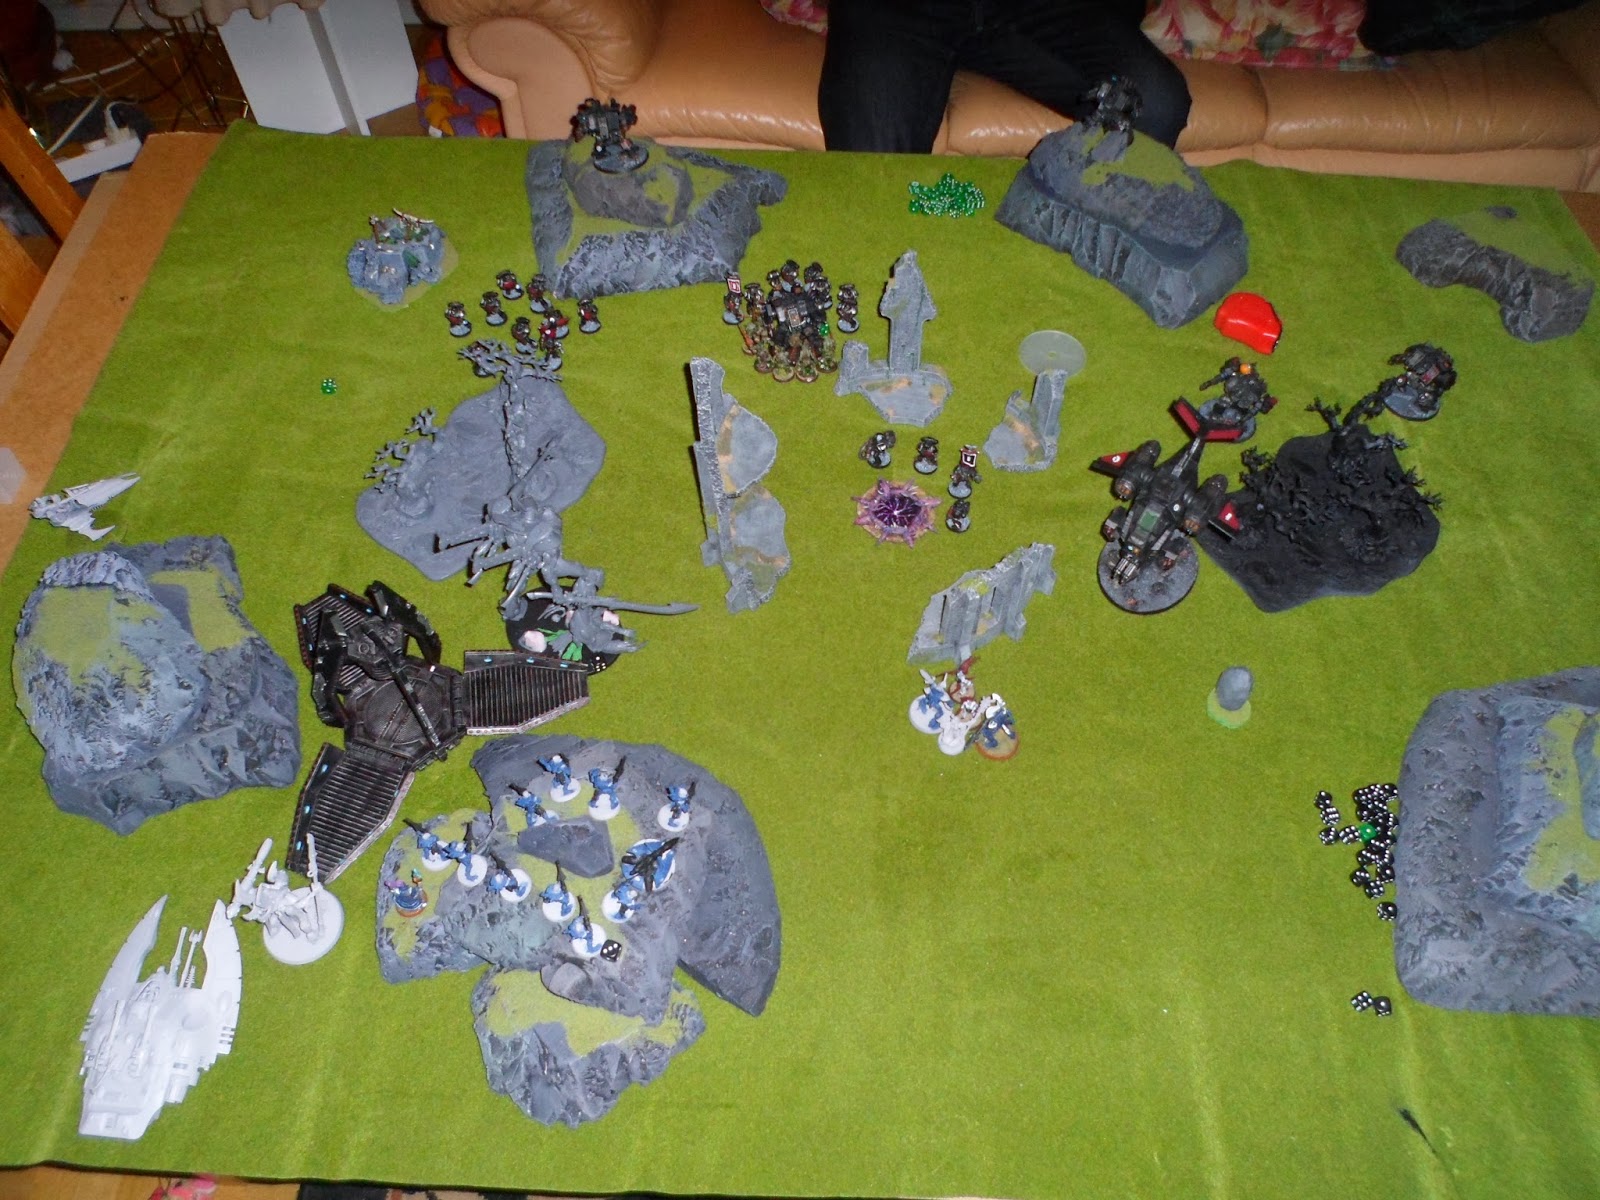
I deployed very defensively (you can't even see all of my army on the pictures...), hiding far back and Troops in Reserve as well as Outflanking Seekers.
He deployed pretty aggressive, keeping his Jetbikes in reserve.


For some reason I split my army up here, Be'lakor and one Prince (who had Eternal Warrior due to Iron Arm) goes on one flank and the other two goes up the other flank. Huge mistake. Don't split up a Flying Circus.
Be'lakor Puppet Master the Wraithknight and unleashes the Wraithcannons on the visible Wave Serpent. He made his Cover save from Night Fighting on both pens. Ah well.


Needless to say, my Prince who flew way too close to his line died turn 1...


One unit of Daemonettes drop in, and the Seekers arrive. For some reason I decide to try and use them to chase after the two Autarchs. Silly move, they should've gone straight for the Wraithknight. Be'lakor moves up like a boss, Vector Striking some Dire Avengers and also gets the Grimoire treatment for that nice 2++. Puppet Master again, but I fail to wound the Serpents again.


I kind of lost track of pictures here, this is turn 3 I think. What happened in between was the Autarchs charged the Seekers... and wiped them out in one go because of a horrible Instability roll... The Wraithknight instakilled the Keeper (damn those Distortion shots!). I managed to swarm the Relic at least, and eventually Be'lakor charged the Wraithknight and easily killed him. But that was basically my only victory, as my other Princes quickly went down to Wave Serpent Shields grounding them, and then those nasty 6's on D-scythes. With my Princes gone he went on to charge his Mantarch into my Daemonettes, wiping them in one go as well, and Spiders shooting off my other Troops.

So in essence I lost this game with that early mistake pretty much. After that I played catch up, but just couldn't do it. Even with his Jetbikes out for most of the game he completely out shot me. Of course I had to have a re-match!

Game 2

We switched up the terrain a bit and went at it again. Again Hammer&Anvil deployment, but Emperor's Will this time.


I won first turn again and deployed defensively again. Daemonettes Deep Striking and Seekers outflanking. Turn one I moved up behind the large hill (which is a Line of sight blocker). I put Grimoire on Be'lakor and felt invincible, so I put him on top of the mountain. Perhaps not the smartest move, but pretty baller at least.
He tried to bait me with his Warp Spider by putting them up front to draw me in. It totally worked, except for one thing... I rolled awesome on my lash-shots and killed all but one. Trap disarmed.


Wraithguard and Wraithblades came out to play, and his entire army shot at Be'lakor. He brought him down to a single wound left, but he took it like a boss. Bold move passed.

My turn 2 came up, and I rolled a 3 on the Warp Storm table... randomised the target (I had six Characters on the table so wasn't worried at all!). And of course it hits Be'lakor. What! I rolled my three dice, knowing I only had to roll 11 to lose my Warlord and First Blood... and rolled:


Aw yeah. No Chaos Gods will mess with Be'lakor!


Massive fly-by of Vector-striking Daemon Princes pretty much wiped out the Wraith-units. The last one was charged and quickly killed in assault.
Seekers also came in, and this time there was nothing to distract me from the Wraithknight as he had even deployed close to a board edge. I tried to surround him to be able to auto-charge next turn.


Be'lakor finally went down in the Eldar turn, but he had done his job really well all ready so that was okay. He tried to escape with the Wraithknight and wither down the Seekers. Didn't help much.


Seekers finished off the Wraithknight, Daemon Princes went after his Troops and the Wraithlord. Not much left of his Troops at this point...


And this was the end. Those Wraithblades are actually Daemons who spawned from the Portalglyph (couldn't be bothered to go fetch more Troops). So basically 4 Dire Avengers survived, one Daemon Prince would come back the turn after. We called it there.

So, game one was a total domination for the Eldar and second was total domination for Daemons! That's how it goes sometimes I guess!

What I learned was how damn awesome Be'lakor is. He's a real boss, not that I ever doubted. Pretty expensive, but so worth every single point. Flying Circus was also quite interesting to play, as it's really fragile sometimes but oh so powerful when it's go-time. Good games!

Feb 13, 2014

Taking the Eldar for a ride on a Daemon World against the Iron Hands

We decided to have another go at the Daemon World rules and scenario from Crusade of Fire! Again, this is a very old game so won't be a real report... but mostly pictures!

I took Eldar since I had just built my Wraithknight into a state where it was playable (during the night actually). So basically a Wraith-army is the majority of my force. I face off against a Dread-heavy list of Iron Hands.


Deployment, I deployed second and went for a refused flank. My Rangers were wiped for First Blood, and also my Guardians gained 4 Possession counters of Tzeentch (granting them a 3++!).


So the first thing that happened in my turn was a unit of my choice got to Deep Strike anywhere... well, of course I moved his Devastators with the Master of Forge right in front of my D-scythes. Thank you for Warlord right there! I also put my Warlord out to be visible... bad move as he was killed right after...


As a thank you for all the mayhem 10 Plaguebearers spawned and charged his Dread, they stood there for most of the game. Some Daemonettes spawned as well and charged my Wraithguard.


He ran to the Objective to try and get some early points, since this scenario is really mean... he also tried to support his Dread with Tacticals. Which simply meant they also ended up locked in combat for most of the game...


Horrors spawned from all the deaths! They started shooting around. There was also something that got teleported the same way as the Devastators did... but it misshaped, and in it's place Bloodletters spawned who ran up and charged the Dread (not that they could do anything against it after Furious Charge had gone off).


Here my opponent decided it was time to remove my invul-save and start withering down my troops... at one point I got this weird occasion that since every time you remove one of the possession tokens you have to re-roll a dice... and that meant I got to re-roll a failed armour save and stayed alive when I should've died! Weird!


Missed a turn here... but the large squad of Tacticals were first mostly killed by the Wraithknight and then teleported on to the Objective... Plaguebearrers spawned and charged in. Guardians shot (killed a lot of Tacticals) and then charged in as well. My Warlock killed his Sergeant in a challenge, meanwhile both of our squads died to Daemons... it left us with one Space Marine, a Warlock and a Guardian.


The Warlock and Guardian graciously decides to start killing Daemons sparing the Space Marine... he returns the favour by killing the last Guardian! AND THEN HE'S TELEPORTED OUT OF COMBAT. Leaving the poor Warlock to stand alone against all those Plaguebearers. What the hell!


However, the Daemon World rewarded the lone Marine by turning the forest into a Razorwing Nest which dully killed him. The rest of the battle is basically a lot of spawned Daemons who stand around to die to Dreads they can't hurt.


The Wraithknigt and Wraithguard clear out most of the Daemons around the Objective. The Dread and two surviving Marines (his only scoring unit left alive) finally kill the last Plaguebearers.


It takes all of his Shooting, but the Wraithguard are wiped out. I still have Dire Avengers in the Wave Serpent who're scoring though.


And out they come. Killing one Tactical and finishing off the last Daemons. The Dreads also finally get free out of their Daemons... so he gets some extra Shooting just when he needs it...


Which is enough to wipe out my Dire Avengers, just barely. His last Marine makes a run for it to try and claim the Objective for the last turn of the game... sadly for him I have last turn and the Wraithknight finish him off. 

I was behind all game due to First Blood... but thanks to those Dire Avengers jumping out in turn 6 and claiming the Objective I got 6 points there... turning it around and winning the game for me! Sneaky Eldar tactics!

But I really love this Scenario, it's pure madness. There's so much weird stuff happening all the time which you just can't take into account. And there's also some room for unusual tactics, as you get these Possession counters which you have to decide when to use and remove... and then there's this mechanic where for every five models that die in a turn Daemons spawn in the middle. So the turn where I dropped off my Dire Avengers my opponent had killed three models, so if I killed more than one there would spawn Daemons in the middle who'd screw my Dire Avengers over... So I had to chose targets carefully there!

But really fun game for sure! 

2 games vs Iron Hands

Long time no bat rep... well, I've been lazy and busy but I've had time to play some! Unfortunately these games are 1-2 months old so I can't really remember the details... Instead I'm going to let the pitctures paint the story!

This first one is a 1500 point game, my first one against the new Iron Hands, and my first game using the Black Legion supplement. I went for Chosen in Rhinos, a couple of bikes, a couple of Obliterators, the Sorcerer with the Nova-power, a Lord and a Maulerfiend. The idea was to rush him basically.

He had lots of Tacticals (one melta squad in a Rhino), a squad of Assault Marines Deep Striking, Devastators and Centurions, a Storm Talon and the Eternal Shield Commander.

Hammer and Anvil, Emperor's Will.


The Drop Pod Melta came in turn one and totally whiffed everything. 


My Bikes turned around and got First Blood from the Pod. Killed the Melta Gun in the Explosion... The next turn the surviving Marines walk up right next to the Rhino... and all four of these super humans with their years of training completely fails to hit the rear armour of the Rhino. To add salt to injury three out of the four die to the four overwatch shots when they charge in...


Assault Marines came in and got assaulted by the Maulerfiend. They stand there forever. The Nova power hit every single of his squads, but he passes all blind tests and just loose a model here and there. 


Centurions and Storm Talon does work on Rhinos.


If you can't tell, my Chosen are simply barging through his stuff. Except for the Centurions and the Shield-Commander (who regained two wounds and splashed my Warlord).


Unfortunately I took no more pictures of this... so you don't get to see the glory that happened with the Maulerfiend. But after the slapfight with the Assault Marines all game the last three finally fled and were not caught. This free'd up the Maulerfiend to run to the other side and make a 11" charge at the now hovering Storm Talon that was withering down my Marines sitting on a Objective. It was exploded. The turn after the Maulerfiend run right back across the board once again and stops the regrouped Assault Marines from taking Line Breaker. Meaning I win the game since I contest his Objective, hold my own and have First Blood. What a hero!


So, let me throw in another game here, just because. This time I wanted to try out my Tau (who are shamefully very unpainted)... I had to ally in some Eldar to get the points up to a good size though. Basically I went with Farsight Enclaves, having a Fire Cadre, 12 Fire Warriors, 3 Stealth Suits, 3 Crisis Suits with Plasma&Fusion, two squads of Pathfinders with both kinds of special weapons, 1 Broadside, 1 Piranha and allied in 10 Guardians in a Wave Serpent with Illic and some Pathfinders.

I faced off against a Land Raider with a Chaplain in Terminator armour and Assault Terminators, Razorbacks, Centurions and a bunch of Tacticals as well as some Assault Marines.

Vanguard Strike and Emperor's Will once again. I got to chose side so I deployed a gunline in the ruins and told him to come at me. Which he gladly did with Assault Marines and Land Raider.


I totally miss-placed Illic. I forgot those Assault Marines had Flamers... and Flamers are nasty for a 5+ armour dude relying on Shrouded... he died turn 1 and gave up First Blood. Bah.


From my last game against the Iron Hands I learned that the Centurions put out a lot of fire power. So they got the pleasure of eating a lot of shots until only one remained (on the hill) at which point he wasn't very effective any more.


At this point I had shot about 8 Fusion Guns at the Land Raider, which was within half range. It refused to die, and it regenerated 4 Hull Points. Bah!


You can't really see it, but 5 Assault Terminators and the Chaplain stepped out of the Land Raider at this point... failed their charge (lost two to all the Overwatch...). The next round all but the Chaplain died. The Chaplain died to Overwatch. Ridiculous. 


Pathfinders Outflanked on the right hand side. You never see them... as it should be. They picked at the Marines in the forest holding the Objective, didn't do much. They also refused to die for quite some time, keeping the Marines distracted.


At this point the Land Raider is immobilized and has lost two guns (the ones that would have been useful). So it's finally out of action, but it simply refused to die!


Wave Serpent turbo boosted forwards and dropped off 10 invisible Guardians (this was turn 7 so couldn't be bothered to unpack them) who contested his Objective in the forest and made sure I won by holding my own, slaying warlord and getting Linebreaker.


So, two games against the Iron Hands! And what did I learn? They have gotten a lot more annoying to kill. Especially those Characters and vehicles with It Will Not Die. It's really frustrating at times! Big boost for them for sure!

I also learned that playing Chosen is fun. They wreck face and rock and roll with the best of them, especially against Marines. The Nova-power is also very much awesome.

In the second game I made two huge deployment mistakes. Losing Illic so early sucked, and the other one was putting the Broadside way off. He was blocked from shooting most of the game really. I should've put him more forward to have been able to take advantage of his shooting more. I also learnt that Tau are very forgiving to play. Just point and roll dice, it'll be okay. I don't think I'll play them much until I've painted them at least, so I can at least look good on the battle field.

More games to follow! Have a bunch of pictures...